Introduction
Upgrading to Windows 11 24H2 unlocks exciting new features, enhanced performance, and robust security improvements. However, the update might not appear right away for all users via the standard Windows Update method. In such situations, modifying the Windows Registry offers a practical solution to enable the upgrade. This guide provides clear and simple instructions to safely tweak your Windows Registry, ensuring you can seamlessly transition to the latest version and enjoy all its benefits.
Important: Before attempting to upgrade your system to Windows 11 24H2, please do the following important actions.
- Back up all your important files to an external USB storage device to ensure that you’ll not lost any files if something goes wrong. Our advice is to create a snapshot of your VM from your client area.
- Make sure you have at least 64GB of free storage space on your C: drive.
- Install all available Windows & Optional Updates.
- Navigate to your device manufacturer’s support site and check if any new drivers are available for your device’s hardware. If so, download and install them.
Step 1. Check your current version
- Press Win + R to open the Run dialog box.
- Type winver and hit Enter.
A window will pop up showing the current version and build number of your Windows system.
Step 2.Download Windows 11 v24H2 in a ISO File.
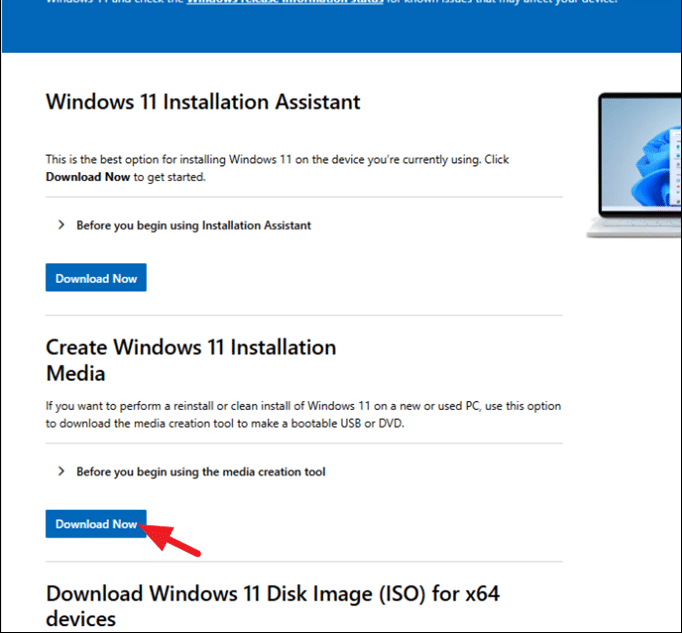
- Navigate to Windows 11 download site & download the “Media Creation Tool” (mediacreationtool.exe), by clicking Download Now under “Create Windows 11 Installation Media”.

- Run the “mediacreationtool.exe“, accept the license terms and click Next at language and edition settings.
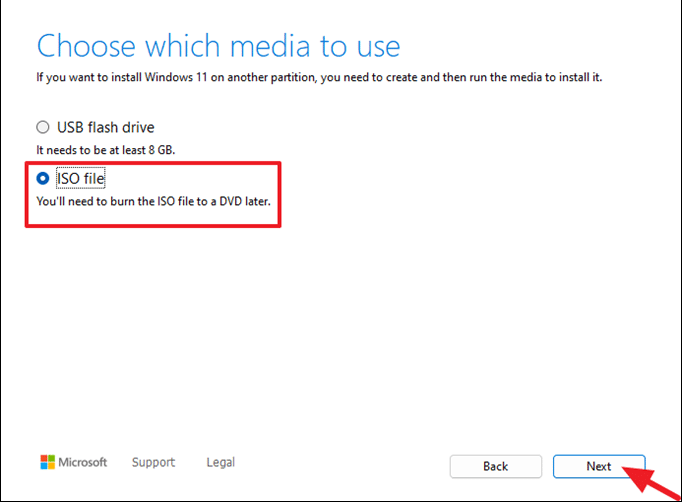
- In “Choose which media to use” options, select ISO file and click Next.

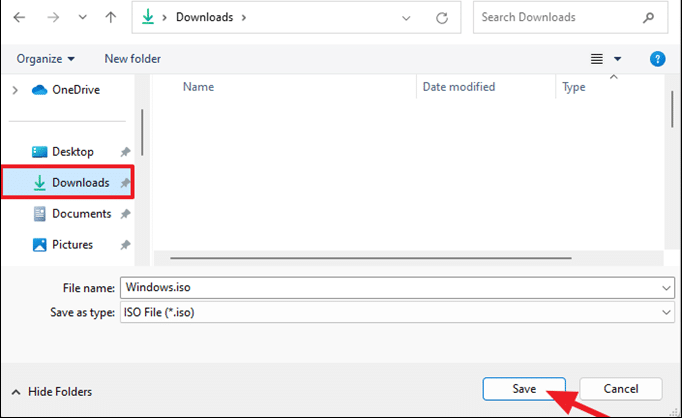
- Select to save the “Windows.iso” file in “Downloads” folder and click Save.

- Then wait the media creation tool to download the Windows.iso file and when its done click Close and continue to next step.
Step 3. Open Command Prompt as Administrator
Launch Command Prompt: Search for Command Prompt in the Windows Start menu, right-click on it, and select Run as administrator
Now issue the following five (5) commands in order (press Enter after each command), to modify the Registry to enable the v24H2 upgrade on your unsupported Windows 11 hardware:
reg.exe delete "HKLM\SOFTWARE\Microsoft\Windows NT\CurrentVersion\AppCompatFlags\CompatMarkers" /f 2>NUL

reg.exe delete "HKLM\SOFTWARE\Microsoft\Windows NT\CurrentVersion\AppCompatFlags\Shared" /f 2>NUL

reg.exe delete "HKLM\SOFTWARE\Microsoft\Windows NT\CurrentVersion\AppCompatFlags\TargetVersionUpgradeExperienceIndicators" /f 2>NUL

reg.exe add "HKLM\SOFTWARE\Microsoft\Windows NT\CurrentVersion\AppCompatFlags\HwReqChk" /f /v HwReqChkVars /t REG_MULTI_SZ /s , /d "SQ_SecureBootCapable=TRUE,SQ_SecureBootEnabled=TRUE,SQ_TpmVersion=2,SQ_RamMB=8192,"

reg.exe add "HKLM\SYSTEM\Setup\MoSetup" /f /v AllowUpgradesWithUnsupportedTPMOrCPU /t REG_DWORD /d 1

Step 4. Mount the Windows ISO File
Right-click on the Windows.iso file and select Mount. (or double-click on the “Windows.iso” file to directly open it)

Then, explore the contents of the mounted ISO file and double click at “setup.exe” to start the installation of Windows 11.

Step 5. Install Windows 11 24H2
Click Next to proceed with Windows 11 installation

Wait for the installer to check for updates and when it finishes click Install to upgrade your system to Windows 11 24H2 without losing your files and settings.

The Windows 11 24H2 upgrade will start, despite the fact that it says “Installing Windows Server”. Sit back and wait for the installation to complete without interrupting it. The computer will restart several times during the installation.

When the installation is complete, your system will enter Windows with all files and settings intact.
Step 6. Finalize the Installation
After the installation, go to Start > Settings > Windows Update, and check for any available updates. Install them to ensure your system is fully up-to-date.
Step 7: To verify that the Windows 11 version 24H2 is installed:
Press the Win + R keys to open the ‘Run’ command box. Type “winver” and hit Enter.


Windows activation
After the upgrade, Windows needs to be activated. Please contact our support team at [email protected]
and provide the necessary access details. This will allow us to complete the activation process efficiently
and provide the necessary access details. This will allow us to complete the activation process efficiently


Leave a Reply