How to Set up Imunify360 on Plesk
In this article, we will explain how you can install and set up Imunify360 on your Plesk server.
Prerequisites
- A Cloud VPS, Pure Performance VPS or a Dedicated Server with Plesk panel
- SSH root access or Admin access to Plesk User Interface
Step 1: Log in using SSH
You must be logged in via SSH as sudo or root user. Please read this article for instructions if you don’t know how to connect.
Step 2: Installing Imunify360
Run the following command to install Imunify360 from the command line and register the imunify360 agent.
wget https://repo.imunify360.cloudlinux.com/defence360/i360deploy.sh -O i360deploy.sh
bash i360deploy.sh
Alternative: Install Imunify360 through Plesk extensions.
Step 3: Configure Firewall
When CSF is used you need to enable the “3-rd Party Integration” which can be enabled through “Imunify360 -> Settings -> General”
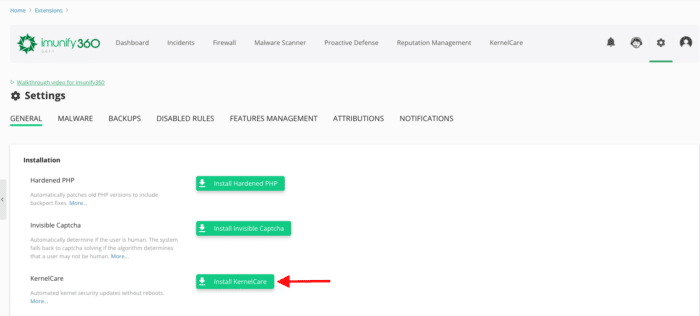
Step 4: Kernelcare
Imunify360 comes with Kernelcare integration. You can install Kernelcare without any extra cost. You can find it at “Imunify360 -> Settings> KernelCare”
When Kernelcare is installed, check if it’s working. Navigate to “Imunify360 -> Kernelcare”.
Step 5: Configure Imunify360
Navigate to “Imunify360 -> Settings -> General”.
WAF Settings
Apply CMS-specific WAF Rules = Enabled
Minimized ModSec Ruleset = Disabled
WordPress Account Compromise Prevention = Enabled
DoS Protection
SMTP Traffic Management
We keep this feature disabled since we provide smarthost which prevents SPAM.
Incidents logging
Log level = 4
Keep incidents for the last days = 100
Keep maximum incidents count = 100000
Auto-refresh time for Incidents page = 10
Send additional data = deselected
Webshield
Enable WebShield = Enabled
Detect IPs behind CDN = Enabled
Anti-bot protection = Enabled
Google reCAPTCHA service  = Disabled
Ossec
Active response = Enabled
PAM
PAM brute-force attack protection = Enabled
Error reporting
We disable error reporting to Imunify360
Contact details
Enter an email address to receive security notifications about your server.
Step 6: Configure Imunify360 Malware
Navigate to “Imunify360 -> Settings -> Malware”
Resource consumption
General
Automatically scan all modified files = Enabled
Optimize real-time scan = Enabled
Automatically scan any file uploaded using web = Enabled
Automatically scan any file uploaded using FTP = Enabled
Automatically send suspicious and malicious files for analysis = Enabled
Try to restore from backup first = Disabled
Use backups not older than (days)  = 90
Default action on detect = Cleanup
Enable RapidScan = Enabled
Binary (ELF) malware detection = Enabled
Malware Database Scanner = Enabled
Background Scanning
Run scanning = Weekly
Run on = Sunday
Run at = 3:00 AM
Cleanup
Trim file instead of remove = Enabled
Keep original files for =  14 days
Enable blamer = Enabled
PHP Immunity = Enabled
Step 7: Disabled Rules
Navigate to “Imunify360 -> Settings -> Disabled Rules”
We disable the following rules in Imunify360.
214920 modsec " IM360 WAF: Inbound Points|Total Incoming Points; Known for creating lot of False Positives" all
77316844 modsec "Blocks Post SMTP" all
Step 8: Features Management
In this section, you can enable “Proactive Defense” and “Malware Cleanup” for your users, navigate to “Imunify360 -> Settings -> Features Management”. We activate both features for our own users in order to protect their websites and give them the ability to clean up their website if it’s infected.
Step 9: Notifications
By default, no notification is sent. In this section, you can configure the notifications based on your needs, navigate to “Imunify360 -> Settings -> Notifications”. We have entered a “Default admin emails” and enabled the following notifications “Real-Time scan: malware detected” and “Script blocked”.
Conclusion
You now know how to install and set up Imunify360 on your Plesk server. In case that you need any support or issues related to Imunify360 product, read the Imunify360 support article.


Leave a Reply