Introduction
A virtual private network (VPN) extends a private network across a public network so that you will be able to access your data remotely through the public network securely. You can also use a VPN to secure your internet activity by using the VPN server as a proxy server.
This article will show you how you can set up an L2TP/IPsec VPN on a Windows Server 2016 Standard with step by step screenshots. This VPN can be used to get access to your business network.
We will configure the VPN with the built-in feature (Routing and Remote Access RRAS) which Microsoft is providing in Windows Server 2016. This can feature can be enabled in the Add Roles and Features wizard.
Prerequisites
- Server with Windows Server 2016 Standard installed. If you do not have a server you can order a server on Snel.com
- Access to your Windows Server with administrator or a user with administrator permissions
Step 1 – Log in using RDP
You must be logged in via RDP as an administrator or a user with administrator permission. Please see this article for instructions if you don’t know how to connect.
Step 2 – Update Windows
Open Windows Start menu and click Settings
Navigate to Update & Security

Click on Check for updates to check if there are any updates for your server.

Download and install all updates if there is any available.

Step 3 – Install Dependencies
Open Windows Start menu and click on Server Manager
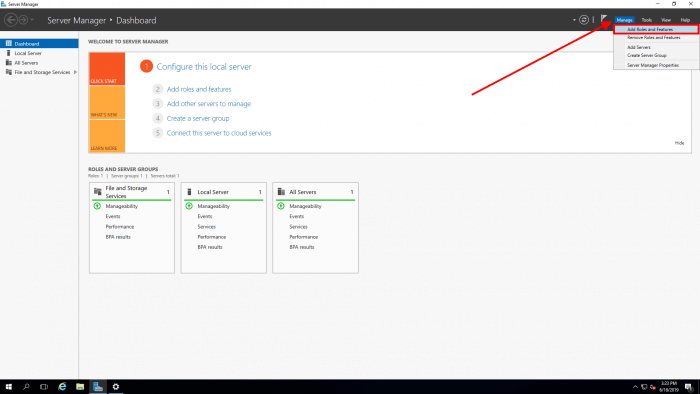
Click on Manage -> Add Roles and Features
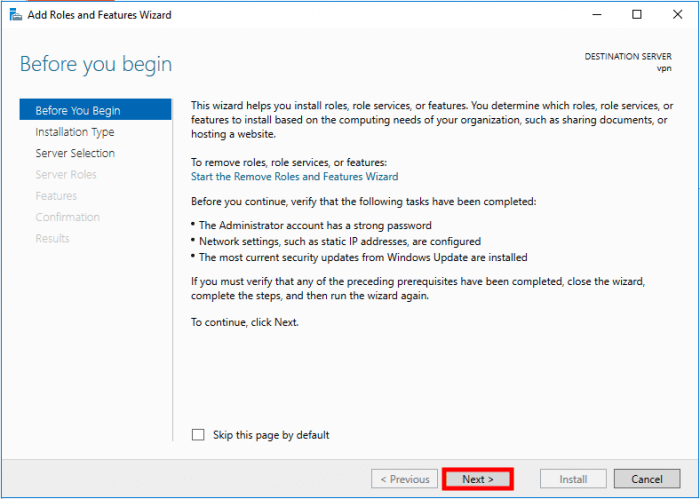
A new screen will be opened and click on Next
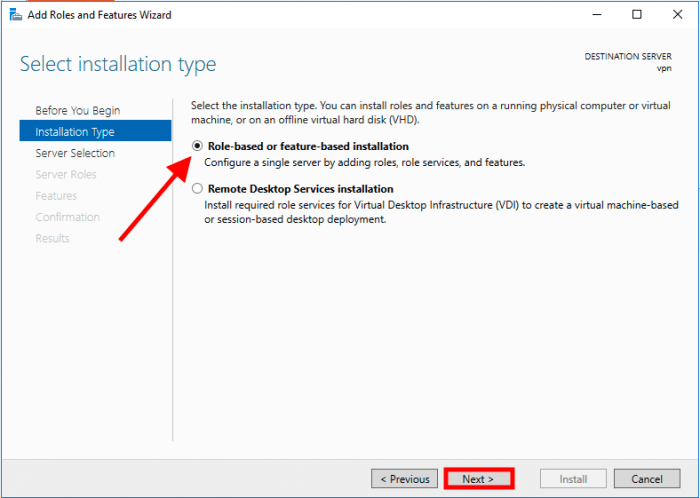
Select Role-based or feature-based installation and click on Next
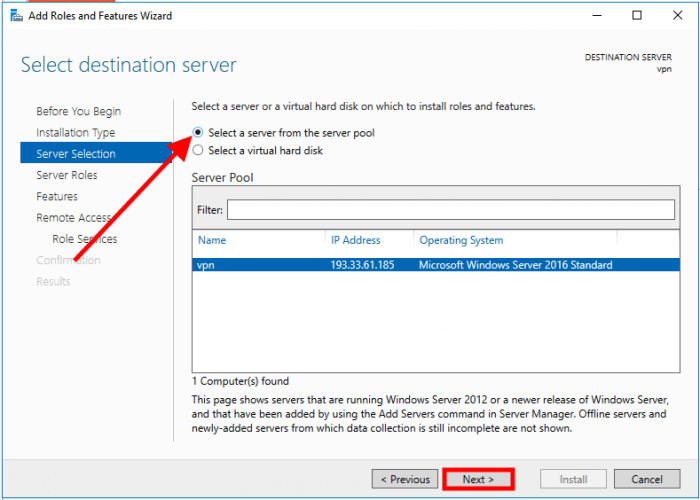
Select Select a server from the server pool and click on Next
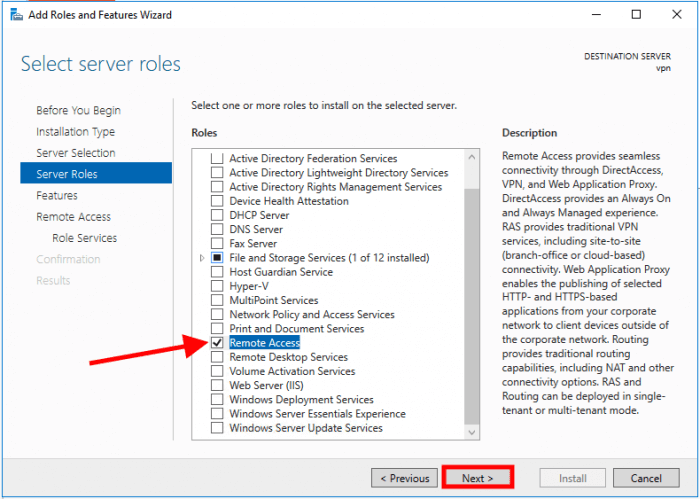
Select Remote Access and click on Next
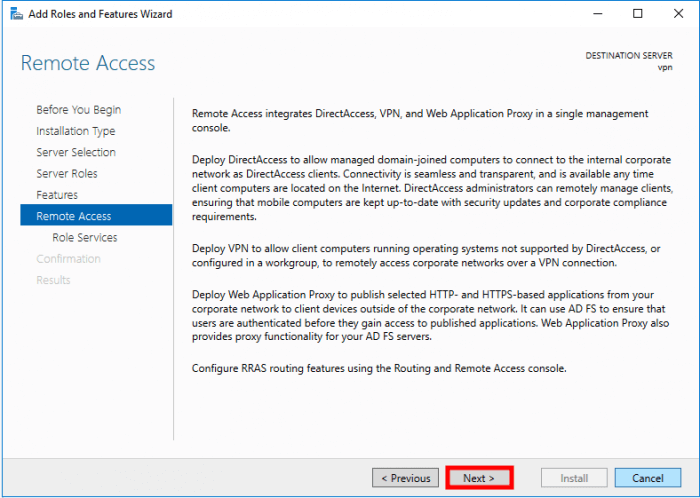
Click on Next
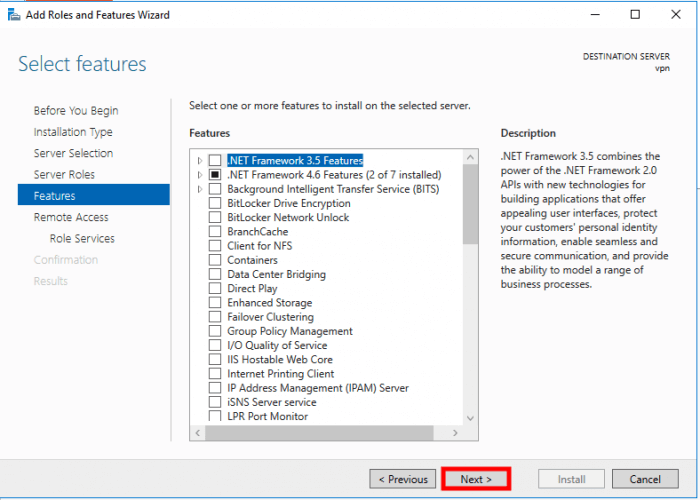
Click on Next
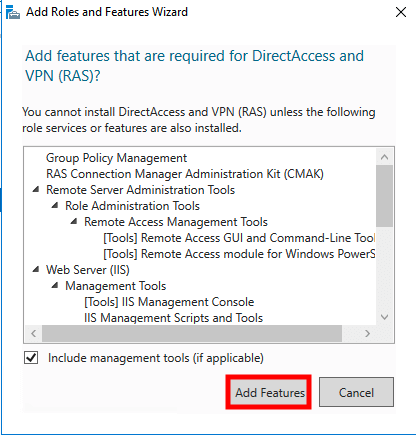
Select DirectAccess and VPN (RAS) and Routing. Once it’s selected a pop up will be shown and click on Add Features
Click on Next
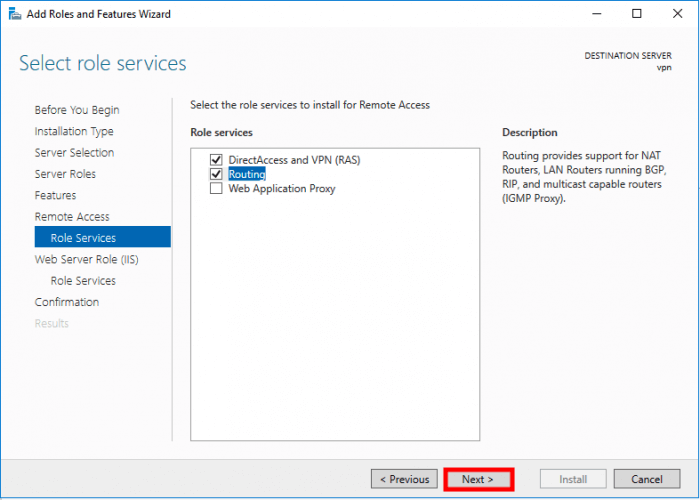
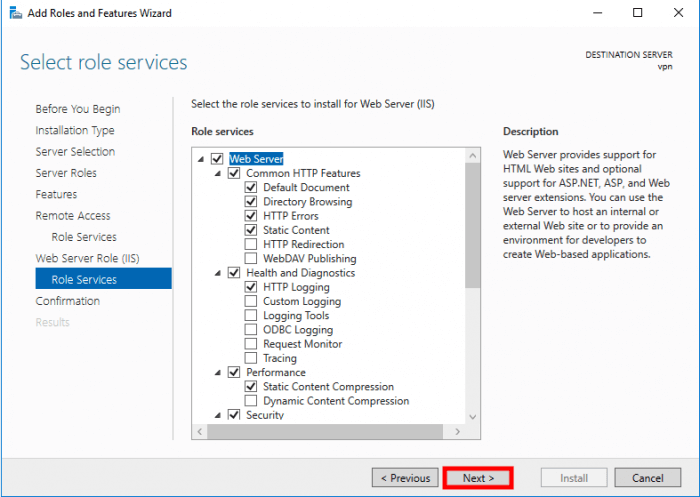
Click on Next
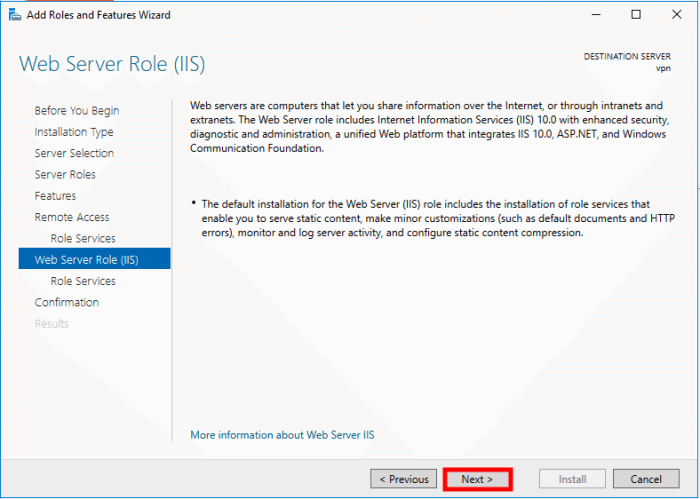
Click on Next
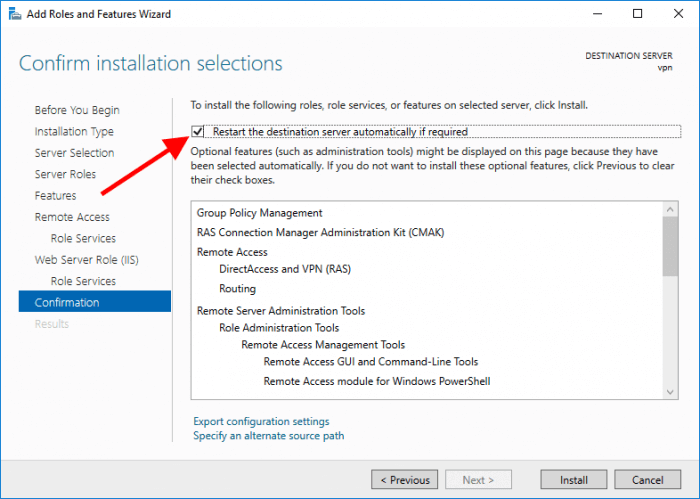
Select Restart the destination server automatically if required
Once it’s selected a pop up will be shown and click on Yes to allow the system to reboot if required.

The last step is to click on Install.
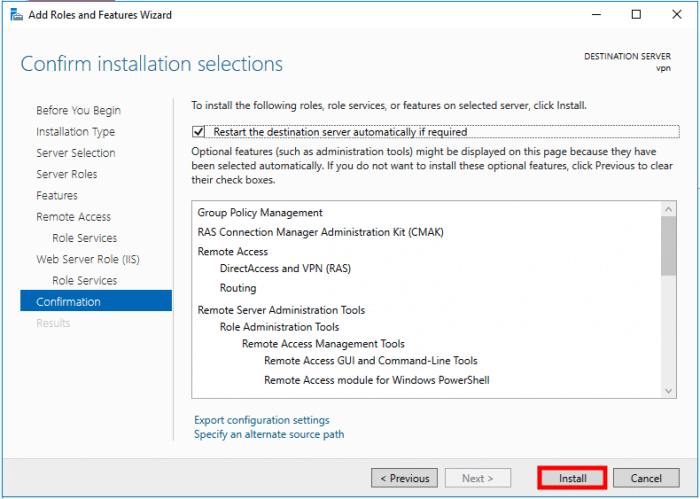
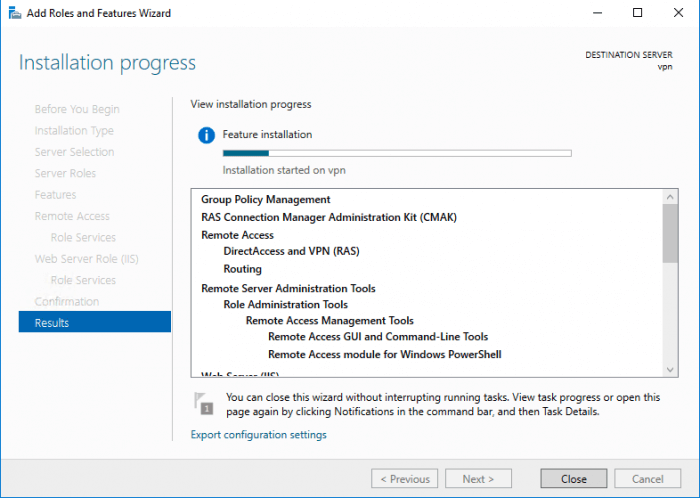
Pending installation.
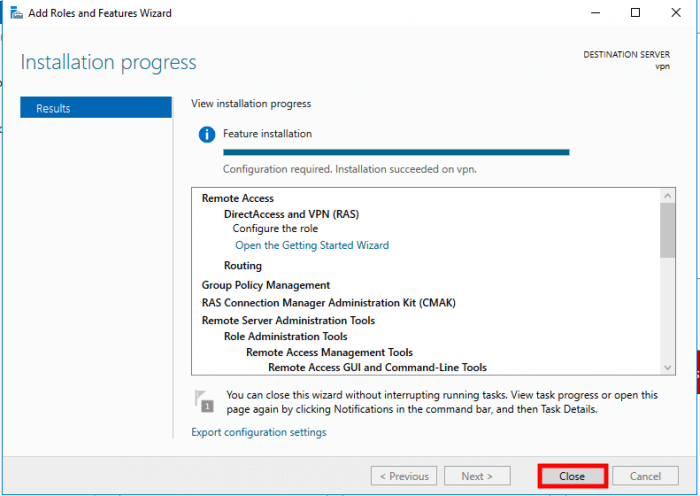
Installation is finished.
Step 4 – Routing and Remote Access
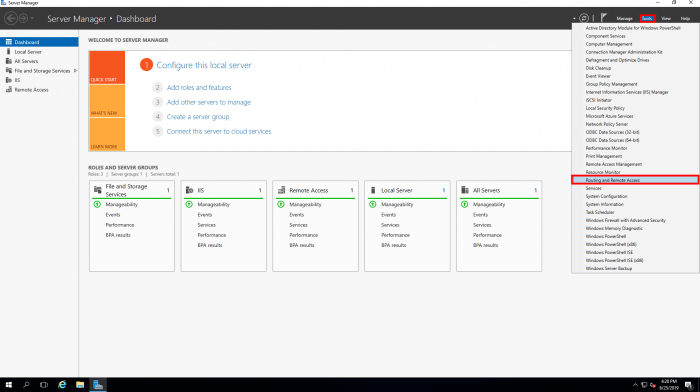
Open Routing and Remote Access in Server Manager -> Tools -> Routing and Remote Access.
A new screen will be opened. Right click on the server name and click on Configure Routing and Remote Access.
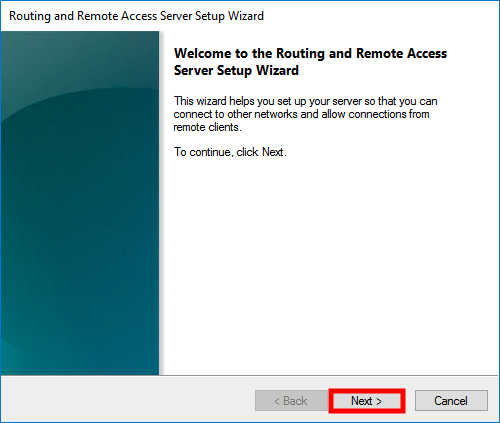
A new screen will be opened to setup Routing Access Server and click on Next
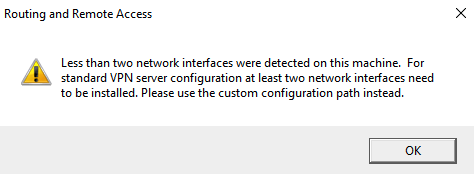
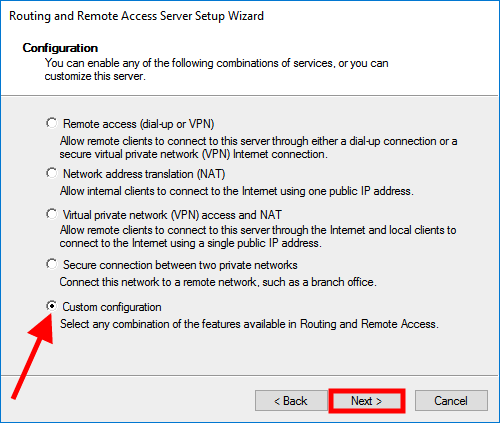
Select Custom configuration and click on Next
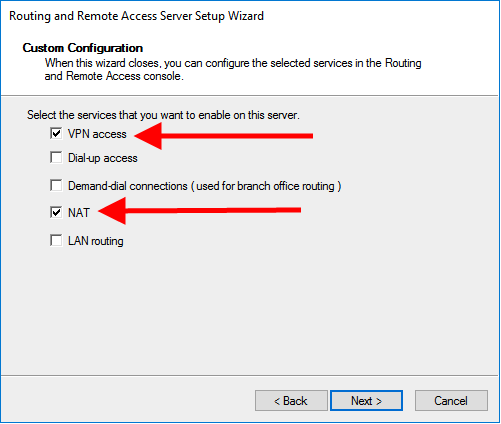
Select VPN access and NAT and click on Next
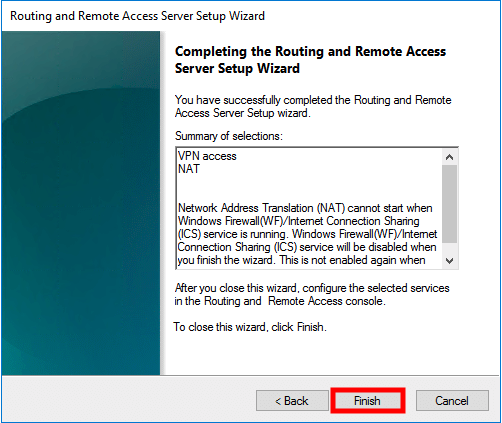
Complete the wizard by clicking on Finish
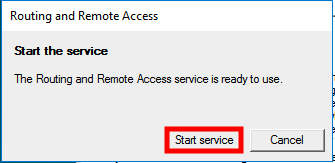
After the wizard is completed a pop up will be shown with the question if you want to Start the Routing and Remote Acess Service. Click on Start Service

Step 5 – Configure Routing and Remote Access
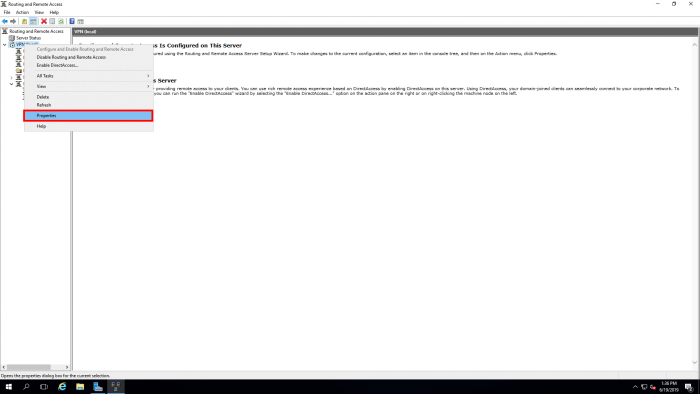
Right click on the server name (VPN) and click on Properties
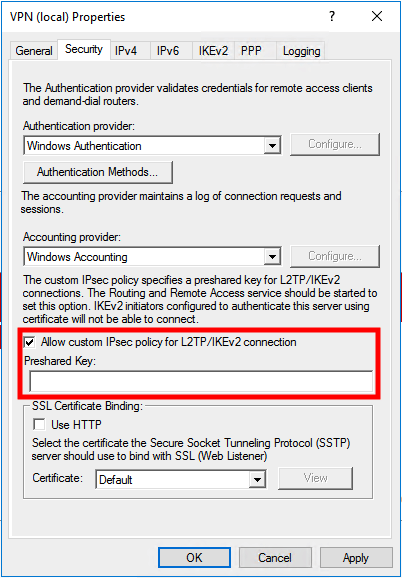
Navigate to Securitytab and select Allow custom IPsec policy for L2TP/IKev2 connection. In our screenshot section Preshared Key but you have to fill this with a strong password.
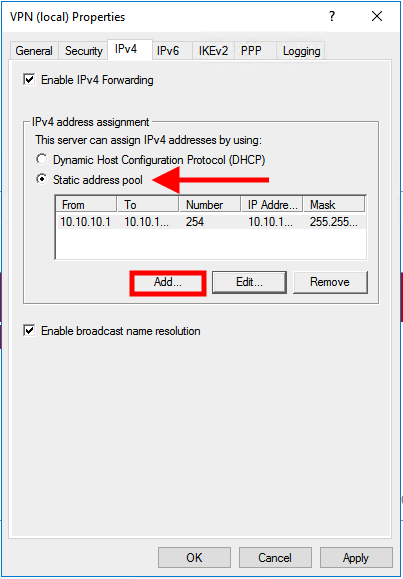
Navigate to IPv4. In our setup we do not have a DHCP server, therefore, we have to select the option Static address pool and click on Addto enter your IP address range.
We used the following range:
Start IP address: 10.10.10.1
End IP address: 10.10.10.254
Number of addresses: 254
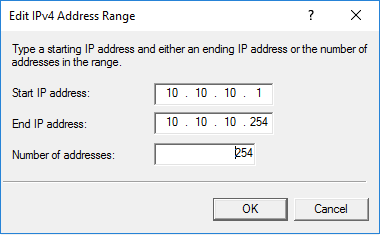
Click on OK to save the IPv4 range.
Click on OK to apply the changes which we made in the properties of the Routing and Remote Access service. You should get a warning pop up with the information to restart the service click OK.

Step 6 – Configure NAT
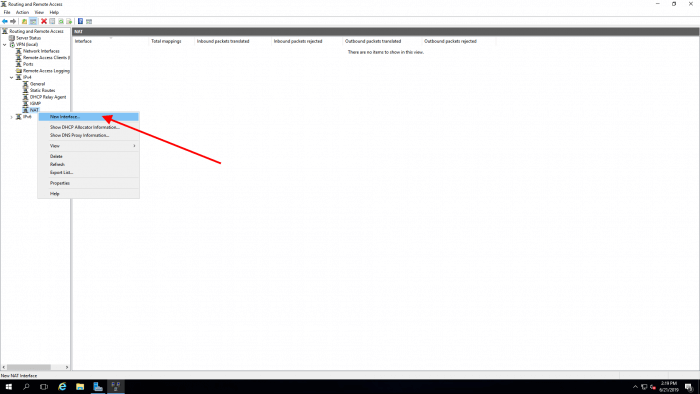
Right click on NAT by navigating to Routing and Remote Access -> VPN (server name) -> IPv4 -> NAT and click on New Interface...
A new screen will be opened and select Ethernet and click on OK.
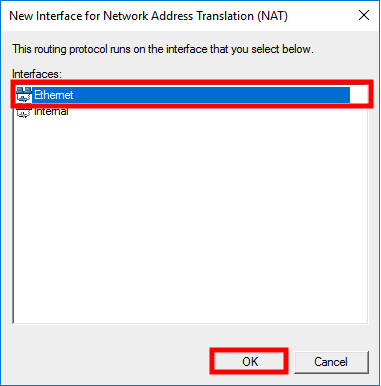
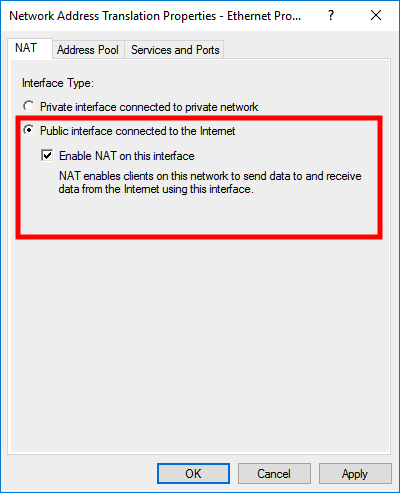
Select Public interface connected to the Internet and select Enable NAT on this Interface
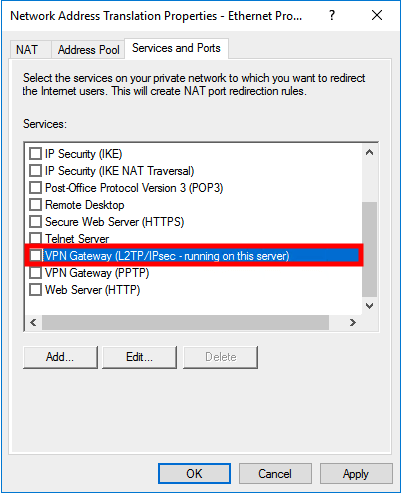
Open Services and Ports tab select VPN Gateway (L2TP/IPsec - running on this server) from the list.
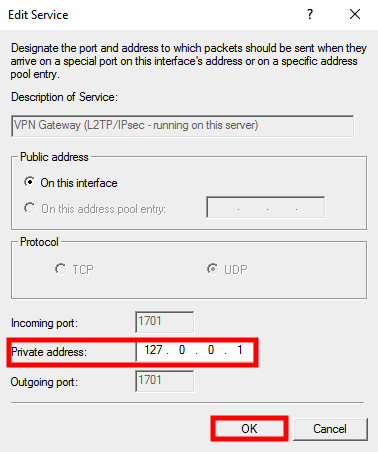
A new screen will be opened. Edit Private address variable from 0.0.0.0 to 127.0.0.1 and click on OK
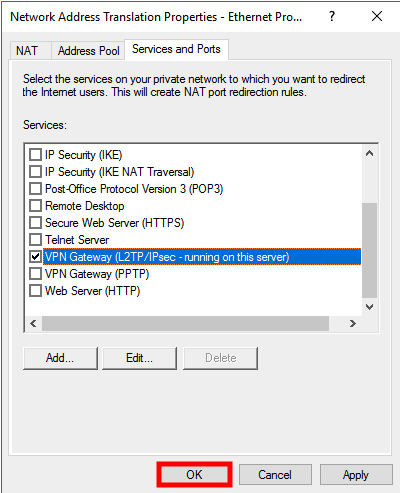
Click on OK
Step 7 – Restart Routing and Remote Access
Right click on server name (VPN) and navigate to All Tasks and click on Restart

Step 8 – Windows Firewall
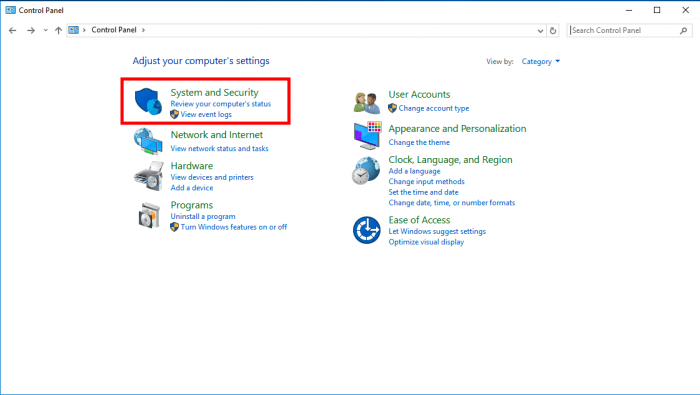
Open Windows Start menu and click on Control Panel
Open System and Security
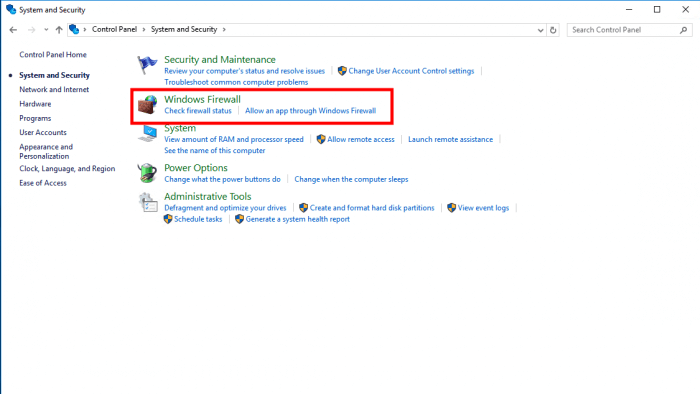
Open Windows Firewall
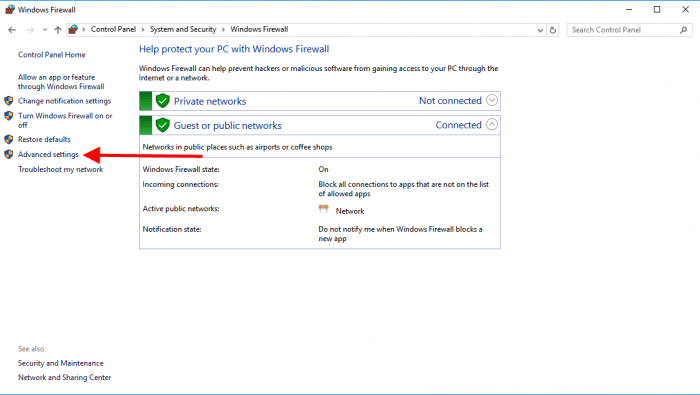
Click on Advanced settingsin the left menu
A new screen will be opened and open Inbound Rules
Create a new rule by clicking on New Rule... in the right menu.
A new screen will be opened. Select Predefined: Routing and Remote Access and click on Next

Select Routing and Remote Access (L2TP-In) and click on Next
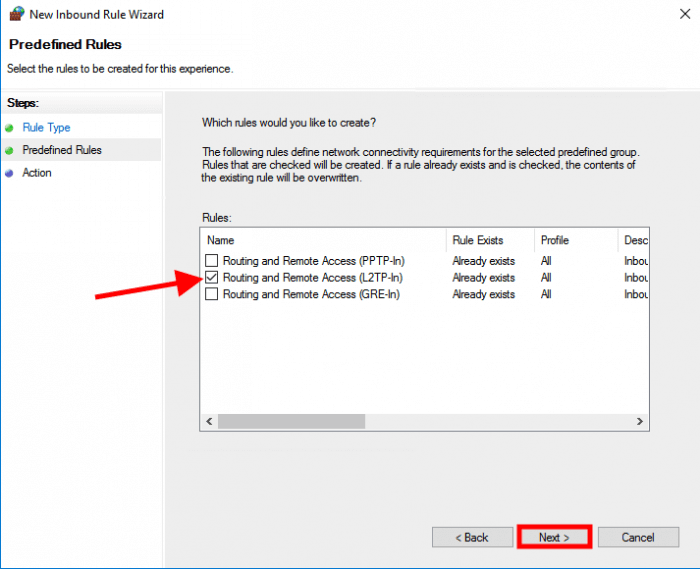
Click on Finish
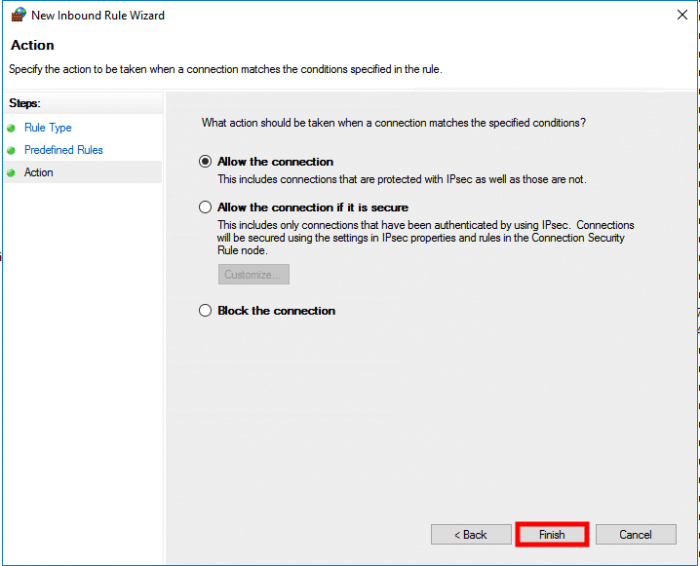
Verify that the rule is created

Step 9 – Configure User(s)
Before user(s) can start using VPN we have to give them permission to connect.
Right click on the Windows icon and click on Computer Management
Open Local Users and Groups from the left menu and click on Users

You should see a list of users of your server. Right click on the user you want to enable VPN and click on Properties
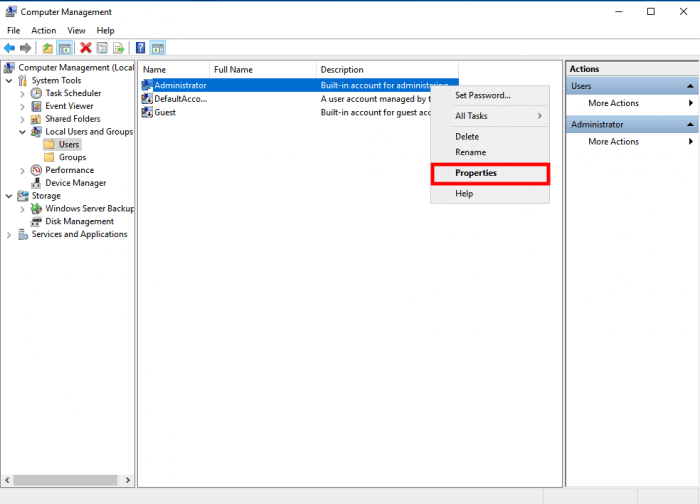
A new screen will be opened with User Properties. In our example it’s Administrator. Open Dial-Intab and select Allow access
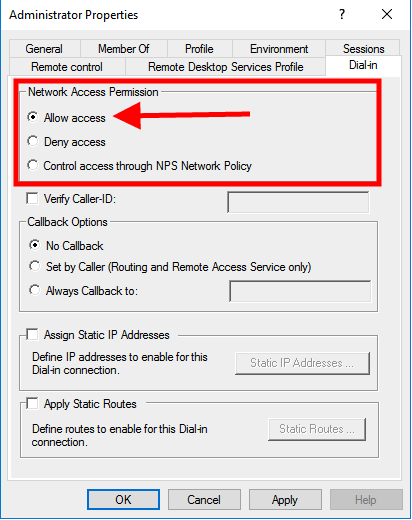
Click on OK and close Computer Management. User Administrator has now the permission to connect to the server via L2TP/IPsec VPN connection.
Step 10 – Remote Access Management
Open Windows start menu and click on Server Manager.
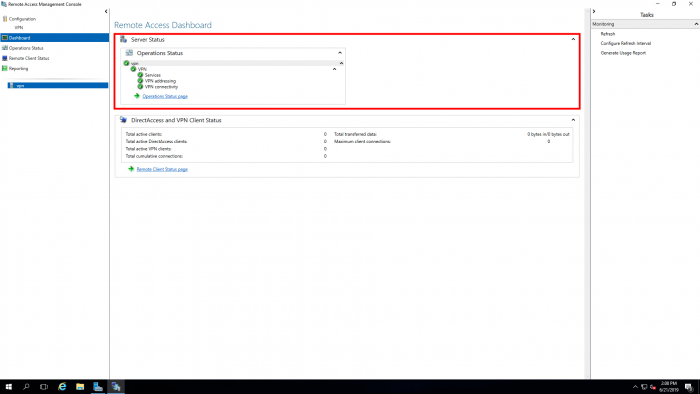
Navigate to Tools -> Remote Access Management. A new screen will be opened with the Remote Access Dashboard. You can see in our overview that services are running without warnings.
More information regarding Remote Access Management can be found here.
Step 11 – Reboot the server
Open Windows Start menu
Right click on the power icon and click on Restart
Step 12 – Client Connection
Conclusion
Congratulations, you have now configured an L2TP/IPsec VPN on your Windows Server 2016 Standard. If you need further assistance or help with configuring your Windows Server 2016 Standard get in touch with our support.







I take it this article assumes that one of the server NICs is directly on the internet?
you've installed NAT routing on the server which I assume takes the place of what many folks do with a NAT router.
so in a typical environment you must forward UDP 500, UDP 1701 and UDP 4500 (IIRC) from your NAT router to your VPN server.
But in this environment, you are accomplishing the same thing by first enabling L2TP on the NAT item within RRAS to allow those services….then forwarding the ports with the automated rule in Windows firewall?
Yes, this article assumes one of the NIC's is public facing. The NAT is needed for routing the traffic between the VPN network and the public network and has nothing to do with being behind a NAT router or not.
Hello
This configuration is IPSec VPN Site-to-Site tunnel or just Remote Access VPN (SSL).
And, is it possible to configure IPSec VPN Site-to-Site tunnel on Windows Server.
Thank you!
Regards,
This is Remote Access VPN. Site-to-Site would need another article as that is dependent on what solution is available on the other side.
I followed through the thread on windows server 2019
however when i start the remote and routing service it fails with the error
"The system cannot find the file specified"
Event id 7024
Do you have issues configuring it on Windows Server 2016 or 2019. If it's an issue related for Windows Server 2019 report it in that specific article.
I couldn't see NAT under …Routing and Remote Access -> VPN (server name) -> IPv4 -> NAT
Did you select NAT in step 4?
I thought I had, but then I looked again and realized I hadn't. Now it's ok, thanks for your input
Hi Ahmet,
Facing the NIC to a public IP Address, what kind of settings do you use for the gateway and DNS?
Another problem is that the IP Address of my ISP is changing a lot of times. How can I fix that problem?
Kind regards,
Dante
Hi Dante,
Yes, it should be a public IP address. Could you elaborate on your question of what you mean with what kind of settings do you use for gateway and DNS?
There is no easy solution if your ISP is providing you with a dynamic IP address. The only solution is to contact them and ask for a static IP address which they provide in some cases.
We provide VPS and dedicated servers managed and unmanaged. All our servers come with a public static IPv4 and IPv6 addresses. If you are interested in one of our services feel free to contact our sales department by emailing [email protected].
Hi,
everythink is ok, but I can't connect to this server via RDP, even ping is not working.
If I turn off firewall it works (via vpn), but from public network as well.
I put inbound firewall rule (custom) to allowy everythink, and I put just in scope
my vpn ip, and it didn't work. Have you got any solutions?
Hey Karal,
If I understand it right, it's working fine if you disabling the Windows Firewall? Did you enable RDP connections in the Firewall? Ping (ICMP) requests are disabled by default in Windows Firewall you can enable this.
Hi Ahmed,
yes. If I turn off firewall connection works.
If I enable firewall and put allow TCP 3389 it works as well.
But with this rule I can connect from all public ip addresses.
If I put to this rule scope change from "Any Ip address" to "These IP addresses" and put my vpn ip's – it doesn't work.
You have to double-check the firewall rules since you mentioned that it's working if it's disabled. In step 8 of our article we are providing instructions on how to configure the firewall rules.
I have checked it many times. I have revert system checkpoint and configure it couple of times. L2tp connection always works. Even if it was over nat I could log into other devices (router), but I couldn't log into windows rdp.
You should check if the user is authorized to login via RDP and if the RDP firewall is configured. You have to debug the firewall rules since its working once it's turned off.
User is authorized, because I can login from public ip (when firewall is off).
How should be set firewall rule to access from vpn but not from public?
Oh, I think I misunderstood you. Are you trying to make make an RDP connection to the same server?
Ok. It works. I have tried to connect RDP to public IP.
I have checked in RRAS l2tp server's ip and it was one from l2tp range.
For others: RRAS > IPv4 > General> Internal
Thanks for help.
Hi, thank you for the tutorial. I configured everything step by step (also client PC on WIN 10 by the tutorial) but client showing me this error:
"The specified protocol identifier is not known to the router."
Please do you have an idea where can be the problem? (I already tried uncle Google)
Thank you 🙂
Hello and thanks for this useful tutorial
I did all this successfully but I can not connect to the server with L2TP but I can connect immediately with PPTP without any problems. Of course, after making the relevant adjustment.
With Tcpview software on the server, I noticed that ports 1701, 500, 4500 are not in listening mode. But port 1723 is in listening mode, so I can connect to it without any problems. Why are L2TP ports not in listening mode after installation and configuration? Can anyone help me?
The same thing happens to me as to:
Jan says
Hi, thank you for the tutorial. I configured everything step by step (also client PC on WIN 10 by the tutorial) but client showing me this error:
"The specified protocol identifier is not known to the router."
Please do you have an idea where can be the problem?
Where do you get this issue on your client or server?
Client
Thanks for your article it helps us alot. Can you please share the article in which VPN server is behind the NAT device means its NIC does not have Public IP but the local IP and one-to-one NAT on NAT device.
Unfortunately this is not a setup we have readily available. We’re unable to create an article for this specific setup right now but we might be able to do so in the future.