Introduction
Our servers are set up with the built-in Administrator user enabled. While this user allows you to login remotely with an administrative user we recommend our users to set up their own users to increase the security and usability of their servers.
Prerequisites
- Windows 10
- An internet connection
- Access to administrator settings
Step 1: Log in as Administrator
Your server is set up with Remote Desktop Connections enabled. You can log in to your server with the Remote Desktop Connection client (RDP) with the credentials sent to you by e-mail or as shown in my.snel.com.
Step 2: Create a new user
We will be creating a new user called MyUser. If you want to use a different username please replace MyUser with your preferred username. We don’t recommend to use spaces and special characters within usernames, you can use the Full name for that.Click on Start -> type “this pc” -> right click on “This PC” -> Click on “Manage”:
In the “Computer Management” console unfold “Local Users and Groups” by double-clicking on it. Next right-click on “Users” and click on “New User…”:
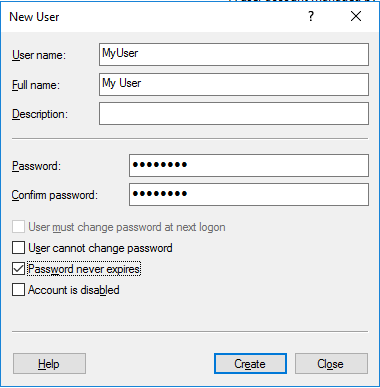
On the next screen fill in the username, full name of the user, password (twice). Uncheck “User must change password at next logon” and check “Password never expires” if you wish. Click on “Create”:
Step 3: Adding another user
We recommend adding another user for administrative purposes
We do not recommend using a user with administrative capabilities on a daily use basis. We recommend adding another user called MyAdmin by repeating the previous steps.
Step 4: Changing the user type
Changing user type from Standard to Administrator
Click on Start -> type user accounts -> Click on “User Accounts”:
On the next screen click on “Manage another account”:
On the next screen click on the user you want to change the role of, here we click on My User:
On the next screen we click on “Change the account type”:
And here we select whether this user should be a Standard User or an Administrator:
Step 5: Disabling the builtin administrator account
Hackers and bots will try to crack the Administrator password of your system because every Windows server has an Administrator user. Because the username is known hackers will try brute-force attacks to hack into your server. It is wise to disable the builtin Administrator after creating your own Administrator account. The following configuration changes need to be done:Click on Start -> type “this pc” -> right click on “This PC” -> Click on “Manage”:
In the “Computer Management” console unfold “Local Users and Groups” by double-clicking on it. Next click on “Users” and right-click on “Administrator” and click on “Properties”:
On the next screen check “Account is disabled” and click on “OK”:
Conclusion
Congratulations, you have successfully created a new user in Windows 10.


Leave a Reply